


Microsoft Windows 11 builds are available now through the Windows Insider Program. However, not every system will be able to support Windows 11 and we are especially talking about the Mac here. The reason behind this is the increase in the hardware requirements for running Windows 11 with the major hindrance being support for TPM 2.0.
Speaking about TPM or Trusted Platform Module, it is a chip built into the logic board or firmware of a system that ensures the integrity of the OS’ security. Introduced in 2014, not all systems are embedded with TPM 2.0. The same is true for both Windows PCs and Mac systems. Let us dig deeper onto this.
Contents
Windows 11 On Mac – TPM 2.0 | Is it Possible?
As of now, neither Intel or M1 Macs have a TPM built into the motherboard. However, speaking exclusively for Intel Macs, a few of them does have TPM built into the CPU which, theoretically, does allow them to support Windows 11. Following is the list of Intel Macs that have a TPM built into their CPU.
- MacBook (Retina, 12-inch, 2017)
- Mac Book Air (13-inch, 2017)
- MacBook Pro (15-inch, 2016)
- Mac Book Pro (13-inch, 2016)
- Mac Mini (2018)
- iMac Pro (2017)
- iMac (Retina 5K, 27-inch, 2017) (Retina 4K, 21.5-inch, 2017) (21.5-inch, 2017)
- Mac Pro (2019)
However, like we said above, theoretically above devices can support Windows 11. But, to make this official, Apple requires updating macOS to support TPM and Windows 11, which is highly unlikely given the fact that M1 Chip Macs have replaced Intel Macs and M1 Macs come with T2 chips. But, if you do want to run Windows 11 on Mac, we can make use of a virtual machine like Parallels. Before you continue ahead, you must know that only the ARM version of the Windows will work on M1 Macs which is similar to the regular version but supports less software.
Check out CumSync – Clipboard Sync for Windows/Linux/macOS [Release].
Install Windows 11 on Mac [Intel] [STEPS]
If you own an Intel Mac from the above given list that has TPM chip built in the CPU, theoretically, you can utilize Boot Camp Assistant to install Windows 11. However, please note that the official support for the same hasn’t been provided yet. The below workaround does allow you to bypass the requirement of TPM 2.0.
What You Need?
- An Intel Mac running latest macOS that supports the minimum system requirements to run Windows 11. Following are the minimum system requirements mentioned by Microsoft.
- A “modern 64-bit processor” according to Microsoft
- 1Ghz clock speed
- 2 cores
- 64GB storage
- 4GB RAM
- UEFI, Secure Book capable & TPM 2.0
- 9-inch display with 1366×768 resolution
- DirectX 12 compatible graphics / WDDM 2.x
- Windows 11 ISO File. (Please note that you won’t be able to locate the ISO file for Windows 11 on Microsoft’s official website. You can either locate the ISO file over Google or follow the below steps to create Windows 11 ISO file by yourself)
[How-To] Create Windows 11 Insider Build ISO File
Using UUP Dump Tool
We will be using the UUP Dump Tool for the purpose. The tool downloads cumulative updates from Microsoft Servers and then is able to repackage the updates into an ISO file. Following are the steps that you require following.
- Please navigate to the UUP Dump Webpage from here.
- Under Quick Options, you can select either ARM64 or X64 present next to the channel name for which you require downloading the ISO image.
- Next, on the Server Response page, tap on Cumulative Update for Windows 11 (10.0.22000.51).
- Next, select your preferred language and thereafter check mark the editions that you want to be a part of the ISO file.
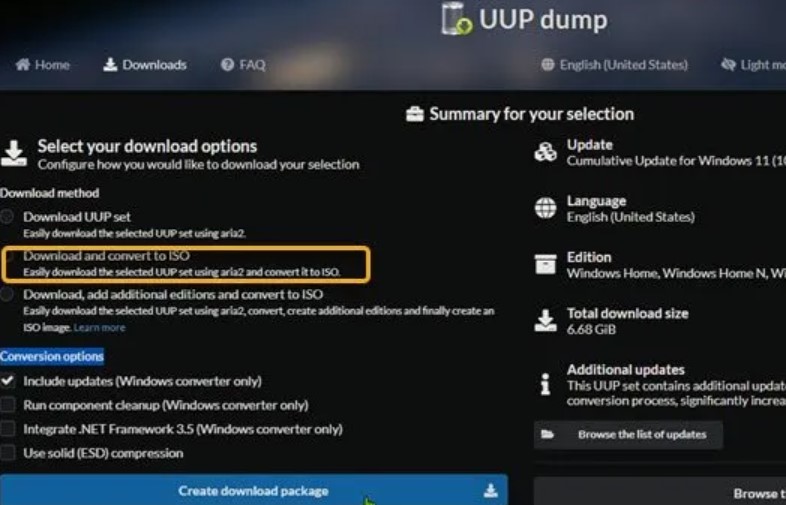
- Hit Next, and under Download Method section, select the option Download and convert to ISO.
- You can select to integrate the updates and more under the Conversion options.
- Tap on Create Download Package.
Please note that the above steps will only create the helper package that will connect to the Microsoft Servers. After you have the Download Package, please follow the below steps to build the ISO image.
- Unzip the archive package. Make sure there are no spaces in the name of the package.
- Double-click on uup_download_windows.cmd.
- This will initiate the ISO building process once the complete set of files are downloaded.
- After the process is complete, you will have Windows 11 ISO file in the same folder where you downloaded the helper package.
Using AnyToISO Tool
Please note that you can utilize AnyToISO Tool as well to create an ISO file. Following are the steps for the same.
- You can download AnyToISO Tool on your machine from here.
- After successful installation, please launch the tool.
- Make sure you have Windows 11 Insider Preview build downloaded on your system.
- Tap on Folder to ISO -> Browse for Folder.
- Select the Build Folder and tap on Open.
- Hit the Make ISO button.
Check out Boardy Tweak – Syncs iPhone Clipboard with Mac & PC.
Install Windows 11 on Intel Mac
Before you start with the following steps make sure Boot Security is set to Full. You can check the same by tapping Command + R key as soon as your Mac boots up and the Apple logo comes up on the screen. Other thing, please make sure that Allow Booting from External Media is enabled.
- Using Boot Camp Assistant, please create a Windows partition.
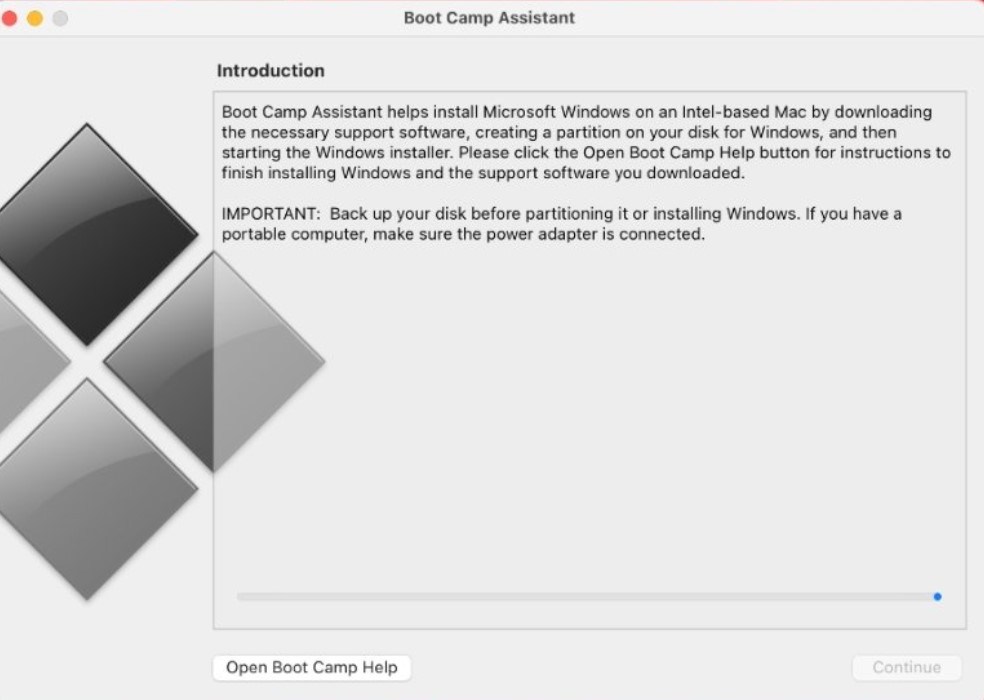
- From Applications > Utilities, please launch Boot Camp Assistant.
-
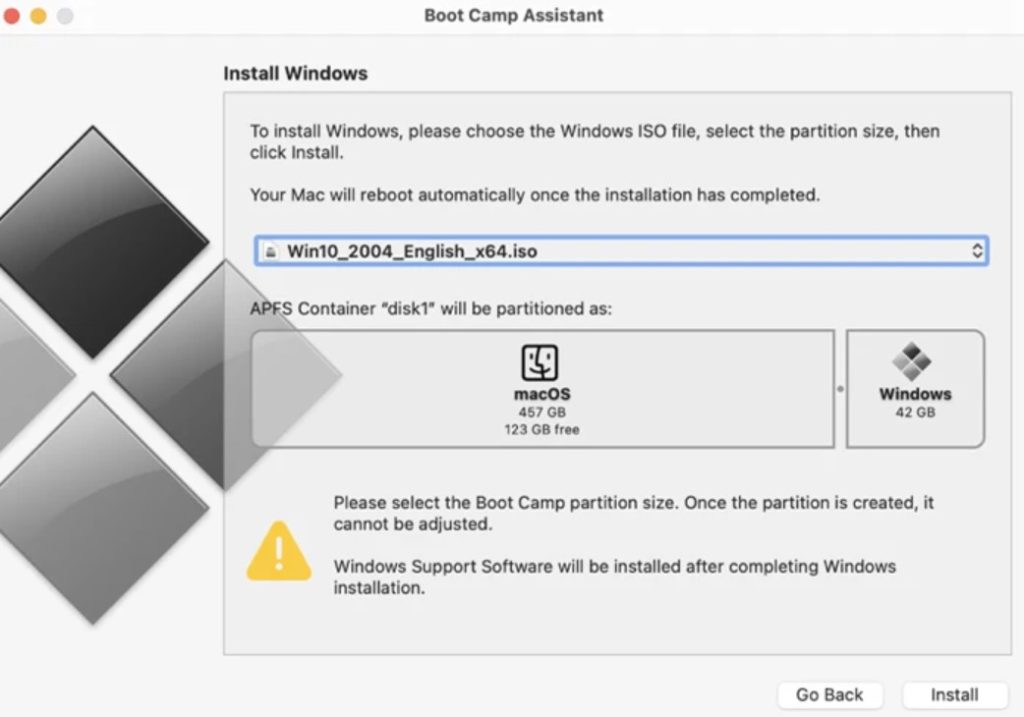
- Hit Continue and select the Windows 11 ISO File.
-
- Post selection of the ISO file, you will be needing to create a partition. Your storage size needs to be greater than 64 GB.
- Please note that storage size cannot be changed later after the installation is complete.
- After this Boot Camp will format the partition and your Mac will reboot.
- Please enter in your user password to begin installation of Windows 11 on Mac. Select the partition that you created.
- Great! Now, Windows 11 installation will start. Follow simple on-screen installation instructions. You require creating a Microsoft Account as well during the installation.
- After Windows 11 on Mac installation is complete, your Mac will reboot.
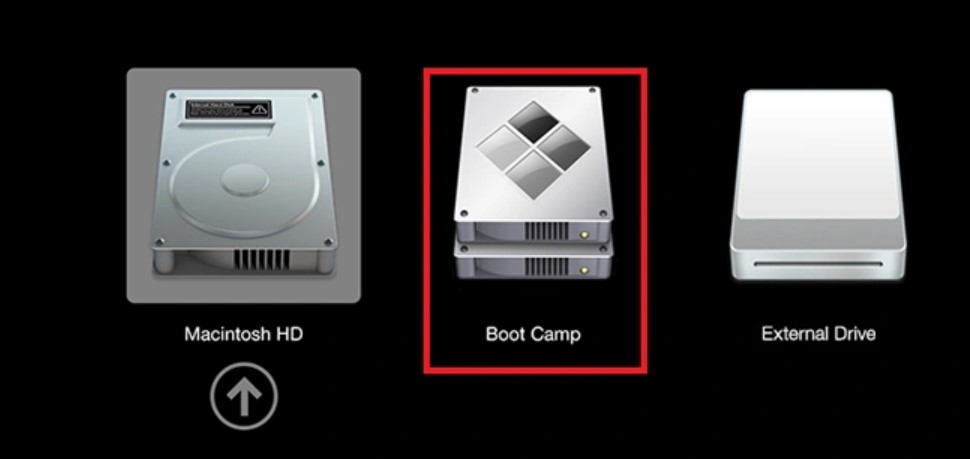
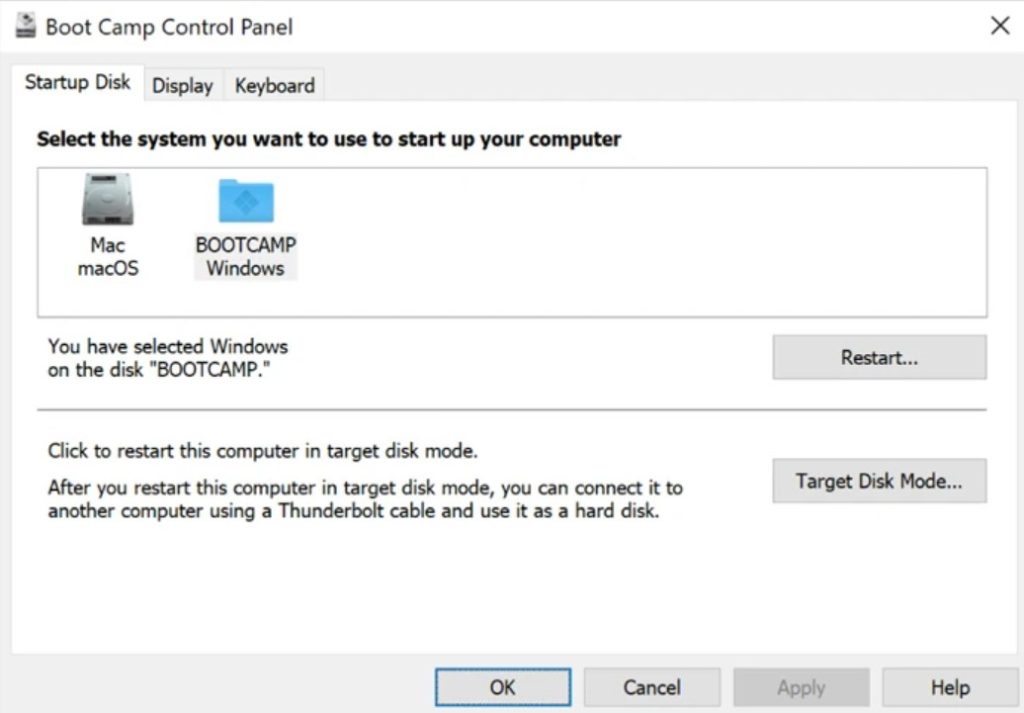
- Upon reboot your Mac will ask you the startup disc. To boot into Windows 11, simply select Boot Camp. You can utilize the Boot Camp Control Panel to set up the primary boot method.
That’s it! You have successfully installed Windows 11 on Intel Mac.
Install Windows 11 on Mac [M1] [STEPS]
Since M1 Macs don’t have Boot Camp Assistant, we will be using Parallels Desktop to run Windows 11 on M1 Mac. For this process to work you require taking care of the following prerequisites.
Prerequisites
- An M1 Mac with the latest updates
- Parallels Desktop
- 22 GB Free Storage
- Windows 10 Insider Preview ISO File (ARM)
Please note that we have mentioned above Windows 10 Insider Preview ISO File. As of now, Parallels Desktop doesn’t support Windows 11 so we have to first install Windows 10 ISO. You will need the ARM version of the Windows 10 Insider Preview ISO File. The same, if not available on the official Microsoft Website, you can get the same way as you downloaded the Windows 11 ISO file while checking out the process to install Windows 11 on Intel Mac.
Check out How to Sideload iOS Apps on Mac using Xcode 7 for free without Jailbreak.
Download & Setup Parallels Desktop
You can download the Parallels Desktop from here. Though the software costs $9.99, you can always check out the trial version for free. After the download and installation is complete, please follow the below steps to setup Parallels Desktop.
- Launch Parallels Desktop.
- A pop-up as shown in the below screenshot will come up. Select the option of Image File.
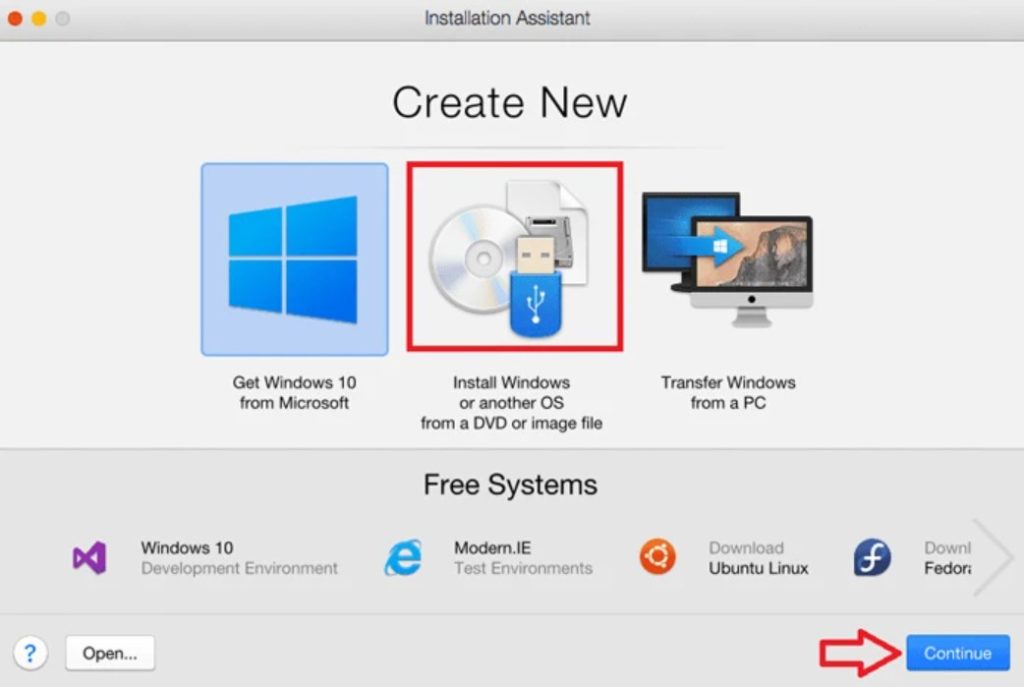
- Tap on Continue and select the Windows 10 ISO file.
- Enter in a name for your virtual machine.
- You can also choose the cores, RAM, and storage space for the Windows to run on.
- Hit the Create button once you are done.
- Get a preview of your configuration. Hit Lock and tap on Continue to initiate the installation of Windows 10.
Install Windows 11 on M1 Mac
Please note that after the above steps are complete, you require making a few changes in your registry to get Windows 11 on M1 Mac. The steps for the same are given below.
- After the installation of Windows 10 ISO is complete, launch registry editor and navigate to HKEY_LOCAL_MACHINE > SOFTWARE > Microsoft > WindowsSelfHost > UI > Selection.
- Please alter the UIBranch value to Dev.
- Make your way to HKEY_LOCAL_MACHINE > SOFTWARE > Microsoft > WindowsSelfHost > Applicability and alter the BranchName value to Dev.
- After you have modified the above values, please reboot your Windows 10. Once the Windows 10 boot up, navigate to Windows Update Settings > Check for Updates.
- The Check for Updates part will notify you of the Windows 11 Insider Preview.
- Now if a TPM related pop-up comes up, following are the steps to bypass the same. Don’t close the pop-up.
- Launch File Explorer and conduct a search for AppraiserRes.dll file. Please navigate to the DLL file location. Do a right-click on it and from the pop-up menu select Cut.
- Please make your way back to the TPM pop-up page and hit Continue. This could be in Chinese.
- In the Windows Update page, tap on Fix issues button to continue. This will initiate downloading of the update file.
- Create a new folder on your desktop and paste the AppraiserRes.dll file.
- As you paste the file, a new pop up might come up with Almost Ready message. If you get the same error then please repeat the above steps again.
- Now, please close the Almost Ready popup and the download will keep on progressing without any further issue.
- Now when the download reaches the part where you received the error message, please cut the dll file and paste the same in its original location.
- The Windows 11 update will now download and install on your M1 Mac.
- Tap on Restart Now when you are asked for a restart. After the restart, you will have the Windows 11 on M1 Mac.
Please note that the Parallels Team is working on ensuring support for Windows 11. Once the same is done, you don’t have to follow the above workaround to get Windows 11 on M1 Mac. You can directly utilize the Windows 11 ISO file instead of using Windows 10 ISO first.
Conclusion – Windows 11 Insider Preview on Mac [Intel & M1]
So, that’s how you get Windows 11 Insider Preview up and running on Intel and M1 Mac. For any kind of queries and questions, please reach out to us via the comments section provided below.
Check out the following interesting posts as well:
- [How-To] Install MacOS Mojave on Unsupported Mac’s [Complete Installation Steps].
- Blackb0x – Jailbreak Tool for Apple TV 2/3 [Guide].